
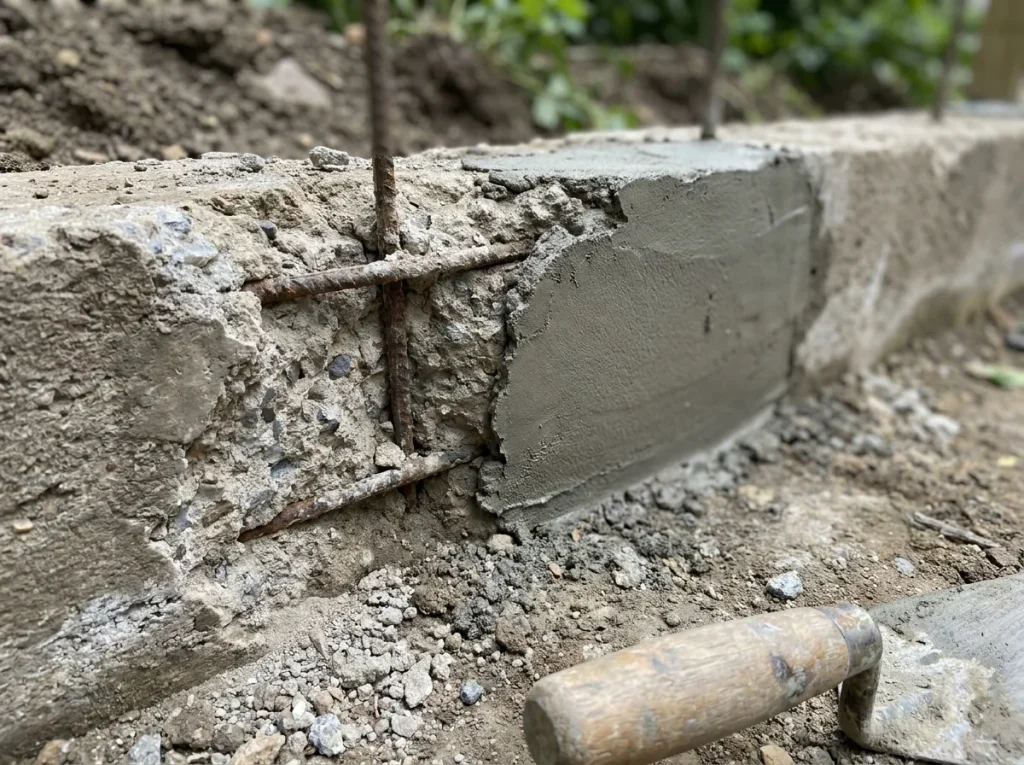
If your Phoenix stem wall is flaking, crumbling, or already showing rusty steel, the honest answer to how to fix spalling stem walls is that you can’t fix it with a bag of patch mix and a trowel. The concrete is failing because the rebar inside it is rusting and expanding, and no surface coating stops that. A durable repair means chipping back to sound concrete, dealing with the corroded steel, and rebuilding the wall the right way — the process handled here in Arizona by Phoenix Foundation Repair Co. This guide walks the real pro process step by step, and shows exactly where DIY patching fails.
Why you can’t just patch over it
Almost every “how to repair spalling concrete foundation” article online tells you the same thing: clean the surface, brush on a bonding primer, trowel on some patch, feather the edges. That advice is fine for a garage floor scuff. On a corroding stem wall, it does not work — and understanding why is the whole point, because it saves you a wasted weekend and a second failed repair.
Spalling on a stem wall is not a surface problem. It’s the visible symptom of a chemical process happening inside the concrete. In Phoenix, the rebar embedded near the bottom of the wall corrodes because moisture and chlorides reach the steel. If you want the underlying cause explained in depth, we cover it in why rebar rusts and spalls in Arizona. Once you accept that the steel is the driver, patching over the outside stops making any sense.
The rebar keeps rusting under the patch
A skim coat of mortar over rusted steel is cosmetic. It hides the damage for a few weeks or months, but it does nothing to the corroded rebar underneath. That steel is still wet, still exposed to chlorides, and still oxidizing. You have effectively painted over a rusting problem and sealed a little moisture in with it. The corrosion continues, and it continues out of sight, which is worse — because now you’re not watching it.
Rust jacking pushes the new patch right back off
Here’s the mechanical failure. When steel rusts, the rust byproduct occupies far more volume than the original steel — several times more. That expansion generates real pressure inside the concrete, a force called rust jacking (or oxide jacking). It’s the same force that cracked and popped off the original concrete cover in the first place. Trowel a fresh patch over the same rusting bar and the expanding rust simply pushes your patch off the wall, exactly the way it pushed the original concrete off. This is the honest answer to why concrete patch fails: you did not remove the force that breaks concrete off the wall, so it breaks your repair off too.
You are not fighting a cosmetic blemish. You are fighting a steel bar that is expanding as it rusts — and no coating on the outside survives that pressure.
The professional repair process, step by step
A lasting repair reverses the actual problem instead of hiding it. The sequence below is the stem wall spalling repair process our teams follow, and each step exists for a specific structural reason. If you want the service overview, start at our stem wall repair page; this is the deeper how-and-why.
1. Inspect and find the extent of the corrosion
The repair begins by finding out how far the damage actually goes, because what you see on the surface is almost never the full picture. A proper look sounds the concrete for hollow, delaminated areas that haven’t spalled yet, traces how much of the rebar is affected, and checks for the drainage and moisture conditions feeding the corrosion. This is where the scope of the job is set. It’s also the point where a homeowner learns whether they’re dealing with a small localized spall or a run of wall that needs real reconstruction. When flaking is widespread, exposed steel is visible, or the wall is cracking along the base, an assessment is warranted before anyone touches it with a chisel.
2. Remove all damaged and chloride-contaminated concrete
Next, the compromised concrete gets chipped away — and here’s the part DIY guides never mention: you cut back past the visible damage, not just up to it. The concrete surrounding a corroding bar is contaminated with chlorides, the salts that drive the corrosion. Even where that concrete still looks solid, it’s chemically primed to keep attacking any steel it touches. If you leave chloride-loaded concrete against the bar, corrosion restarts from that reservoir no matter how good your new material is.
So the removal goes back to clean, sound, uncontaminated concrete, and it exposes the rebar fully — chipping around and behind the bar, not just in front of it. That looks aggressive, and it should. Removing too little is one of the most common reasons a “professional-looking” repair fails within a year.
3. Remove or treat the corroded rebar
With the steel exposed, it gets addressed directly. Lightly corroded rebar that still has its structural cross-section is cleaned back to bright metal and treated so it won’t keep rusting. Rebar that has lost significant section to corrosion — pitted, flaking, thinned — has to be cut out and replaced, because a bar that’s rusted through is no longer doing its structural job. You cannot restore strength by burying a wasted bar in fresh mortar. This step is exactly what a skim-coat patch skips, and it’s the single biggest reason patches fail. The same corrosion mechanism attacks the embedded anchor bolts too, which we cover in why anchor bolts corrode in Arizona stem walls.
4. Reinforce with non-corrosive GFRP composite rebar
Where steel is replaced, the smart move in a corrosive Arizona environment is not to put more steel back in the same spot to rust again. It’s to reinforce with GFRP composite rebar — glass-fiber-reinforced polymer. GFRP doesn’t corrode. It isn’t a metal, so chlorides and moisture have nothing to oxidize, which means the rust-jacking cycle physically cannot restart along that reinforcement. You get the tensile reinforcement the wall needs without reintroducing the exact material that failed. This is how you fix exposed rebar on a stem wall in a way that’s meant to be permanent, rather than resetting the clock on the same problem.
5. Rebuild the wall and restore concrete cover
Now the wall gets rebuilt with a structural repair mortar or concrete engineered to bond to the sound substrate. The goal isn’t just to fill the void — it’s to restore the wall’s original profile and, critically, to restore proper concrete cover: the depth of solid concrete over the reinforcement. Cover is what protects reinforcement from the outside world. Too little cover, and even good reinforcement sits too close to moisture. The rebuild re-establishes that protective depth and brings the wall back to a monolithic, load-bearing surface — not a thin cosmetic shell.
6. Waterproof, seal, and correct drainage
The last step attacks the source. Corrosion needs moisture, so a lasting repair keeps moisture away from the wall. That means applying a waterproofing membrane and sealing the repaired surface, and — just as important — correcting the drainage that let water sit against the stem wall to begin with. Grading that slopes toward the house, downspouts dumping at the base, and irrigation spraying the wall all keep the wall wet. Fix the water and you remove the fuel for the next round of corrosion. Skip this, and even a perfect structural rebuild is working against a wall that stays damp.
Why DIY and quick patches fail in Arizona
Put the pieces together and the failure mode of DIY patching is obvious. The homeowner (or a handyman with a patch bucket) cleans the face, primes it, and trowels new mortar over rebar that is still rusted, still surrounded by chloride-loaded concrete, and still sitting behind bad drainage. Nothing that actually drives the damage was touched. Within a season or two, the same rust jacking that popped the original cover pushes the patch off, often taking a chunk of the surrounding wall with it.
Get Your Foundation Looked At
A quick inspection tells you what is really going on beneath the surface — and we will send a written estimate.
→ Request a Written EstimateIt fails for four specific reasons, every time:
- The rusted steel was never treated or replaced — so it keeps expanding under the patch.
- The chloride-contaminated concrete was left in place — so corrosion has a built-in fuel supply against the bar.
- Concrete cover was never truly restored — a thin skim coat has none of the protective depth reinforcement needs.
- The drainage and moisture source were ignored — so the wall stays wet and the cycle simply resumes.
In our climate the swing between bone-dry heat and hard monsoon soaking is especially unforgiving to a shortcut repair. A patch that traps moisture against corroding steel in that environment isn’t a fix — it’s a delay that usually makes the eventual real repair larger. If you’re still trying to identify what you’re looking at, what concrete spalling on a stem wall actually is breaks down the warning signs.
What a lasting repair actually looks like
A repair built to last is one where the corrosion cannot restart: the contaminated concrete is gone, the compromised steel is out, the reinforcement is non-corrosive GFRP, the cover is restored to a proper depth, and the wall is sealed and draining away from the house. That’s a genuinely different outcome from a patch — it’s a rebuilt section of wall, not a coat of makeup over a rusting bar.
It costs more than a bag of mortar, and it should, because it’s doing something a bag of mortar can’t. As a general anchor, comprehensive non-corrosive stem wall repair systems in the NeveRust class run roughly $2,000 per 20 linear feet, depending on the extent of corrosion and site conditions. The value is that you’re paying once. A weekend of patching that fails inside a year, then has to be chipped out and done properly anyway, is the more expensive path.
If your stem wall is spalling or showing exposed steel, you can book an inspection and get a written estimate for the actual scope of the repair.
Frequently Asked Questions
How do you fix a spalling concrete stem wall?
You remove all the damaged and chloride-contaminated concrete back to sound material, expose the rebar, then treat or replace the corroded steel, reinforce with non-corrosive GFRP composite rebar where needed, rebuild the wall with structural repair mortar to restore proper concrete cover, and finally waterproof, seal, and correct the drainage feeding the moisture. Surface patching alone does not fix it, because it never addresses the rusting steel that’s causing the damage.
Can I patch spalling concrete myself?
You can apply a cosmetic patch, but on a stem wall it will not last. The rebar underneath is still corroding and expanding, and rust jacking pushes the new patch back off — usually within a season or two. Any patch over rusted steel is a temporary cover-up, not a repair. A stem wall showing exposed rebar needs the corroded steel treated or replaced, which is beyond a trowel-and-bucket fix.
Why does patched concrete keep flaking off?
Because the rusting steel underneath never stopped expanding. When embedded rebar corrodes, the rust takes up several times more volume than the original metal, and that pressure — rust jacking — breaks concrete off the wall. If you patch over the bar without removing the corrosion and the chloride-contaminated concrete around it, the same force pushes your new patch off exactly the way it popped the original cover.
Do you have to remove rusted rebar to fix spalling?
You have to address it. Lightly corroded rebar that still has its full structural cross-section can be cleaned to bright metal and treated. But rebar that has lost significant section to corrosion — pitted and thinned — has to be cut out and replaced, because a wasted bar no longer carries load. Burying a badly rusted bar in fresh mortar restores appearance but not strength.
What do professionals use to repair a stem wall?
A structural repair mortar or concrete engineered to bond to sound substrate for the rebuild, non-corrosive GFRP composite rebar to replace corroded steel, corrosion treatment for salvageable bars, and a waterproofing membrane and sealer for the finished surface. Just as important is the process: cutting back past the visible damage to remove chloride-contaminated concrete, and correcting the drainage that kept the wall wet.
Should you replace rebar with GFRP when repairing?
In a corrosive environment like Arizona, it’s the stronger choice where reinforcement is being replaced. GFRP composite rebar doesn’t corrode, so chlorides and moisture have nothing to oxidize and the rust-jacking cycle can’t restart along it. Putting ordinary steel back in the same spot simply resets the clock on the same failure. GFRP gives the tensile reinforcement the wall needs without reintroducing the material that failed.
How long does a proper stem wall repair last?
A repair done correctly — contaminated concrete removed, corroded steel replaced with GFRP, concrete cover restored, and the wall sealed and draining away from the house — is built to be long-term, because it removes the conditions that cause corrosion rather than hiding them. A cosmetic patch over rusted steel, by contrast, often fails within a year. The difference is whether the underlying corrosion can restart.