
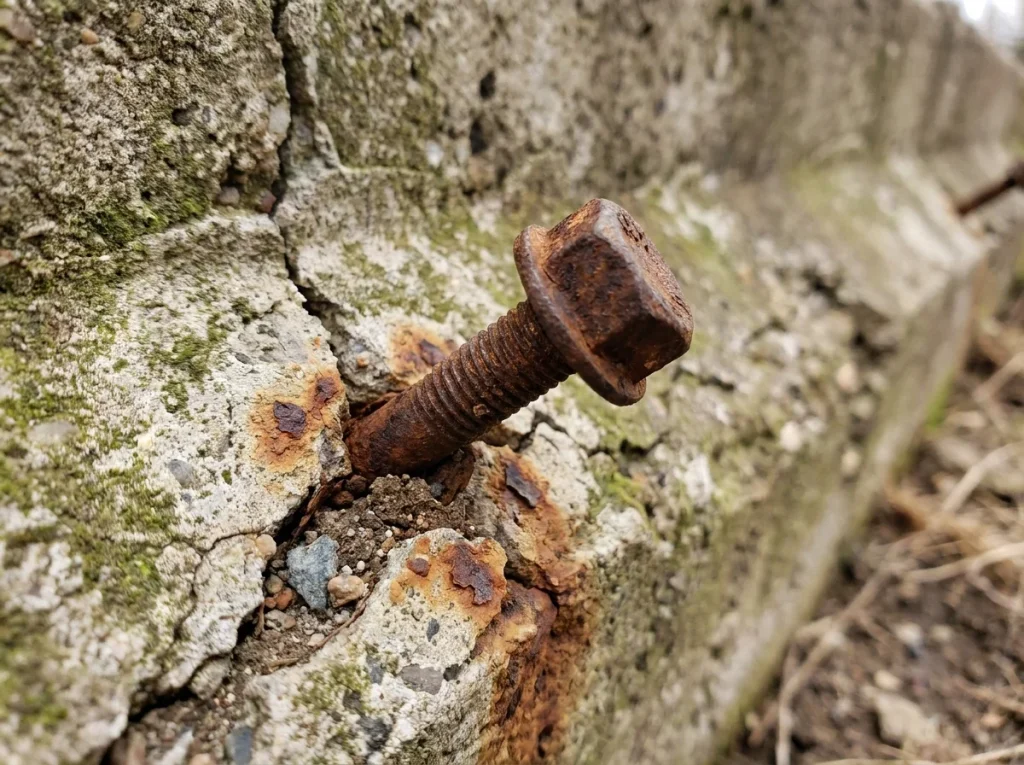
If you’ve popped off the baseboard or crawled under the house and found an orange, flaking nut where the wood frame meets the concrete, you’re looking at the exact problem homeowners across Phoenix search for when they type “how to fix a rusted j-bolt anchor” into Google at 11pm. The short answer is: it depends which of three problems you actually have, and guessing wrong can crack your stem wall. In the Phoenix area, we diagnose the bolt before anyone touches a wrench to it.
What a J-bolt anchor actually does (and why a bad one matters)
A J-bolt (also called an anchor bolt or mudsill anchor) is the L- or J-shaped rod embedded in your concrete stem wall during the pour, sticking straight up through your sill plate — the wood board that your entire wall framing sits on. A nut and washer clamp the sill plate down against the concrete. That single connection is what keeps your house’s wood structure attached to its foundation during wind load, settlement, and seismic movement. It’s a small piece of hardware doing a structural job, and Arizona’s code (based on the IRC) expects it to be there roughly every 6 feet along the sill plate, within 12 inches of each plate end.
When a J-bolt is loose, rusted, or missing, that connection is compromised. The framing above can shift laterally relative to the foundation, which shows up later as racked doorframes, cracked drywall near the base of walls, or — in the worst cases — a sill plate that has actually separated from the stem wall.
The three problems — loose, rusted, or missing
Not every bad anchor bolt needs the same fix. Before anyone quotes a repair, the honest first step is figuring out which of these three situations you’re dealing with.
A loose nut with a sound bolt (the easy case)
If the bolt itself is straight, unpitted, and still fully threaded, and the nut has simply backed off over time (wood shrinkage does this), that’s genuinely a homeowner-level fix. Snug the nut down with a wrench, check that the washer is seated flat against the sill plate, and you’re done. This is the one case in this whole article where you don’t need to call anyone.
A rusted/corroded bolt (why tightening makes it worse)
This is the trap. A rusted anchor bolt looks like the same problem — a loose or hard-to-turn nut — but it isn’t. Iron oxide (rust) takes up roughly six to ten times more volume than the steel it replaces. As corrosion works its way down the embedded portion of the bolt, it expands inside the concrete and can hairline-crack the top of the stem wall around it — the same failure family that shows up as visible concrete spalling at grade level. Crank a wrench on a corroded bolt like that and you’re not tightening a connection, you’re applying leverage to concrete that’s already fractured. It’s common to pop a chunk of the stem wall right off, which turns a $200 problem into a real retrofit.
A missing or sheared bolt
Sometimes there’s no bolt at all — either it was never installed correctly during the original pour, it corroded completely through, or it sheared off under load. This is the most serious of the three, because there’s zero mechanical connection at that point along the sill plate, and it always needs a retrofit anchor installed.
A genuinely loose nut on a sound bolt is a five-minute fix you can do yourself. A rusted bolt is the one that fools people — tightening it often pops the concrete because the rust already cracked the stem wall from the inside.
The homeowner-safe fix vs. the retrofit that actually holds
What you can check yourself (a wrench and a flashlight)
You can safely inspect and even snug bolts yourself under one condition: the bolt shows no rust, pitting, or discoloration, and the concrete immediately around it looks solid with no hairline cracking radiating outward. Grab a flashlight, look at the base of the bolt where it meets the concrete, and check for that rust-colored halo or crumbling edge. If it’s clean, tighten it. If you see any orange staining or the concrete looks compromised, stop and treat it as the corroded case above.
Where DIY epoxy anchors go wrong (edge distance, wet concrete, hidden spalling)
Home-center epoxy anchor kits exist, and in theory a homeowner could drill a hole and set a threaded rod. In practice this is where DIY retrofits fail structurally, for reasons that aren’t obvious until you’ve seen it go wrong: the hole gets drilled too close to the edge of the stem wall (edge distance matters for anchor capacity), the concrete around irrigation lines is still damp and won’t let epoxy cure properly, or the visible rust is only the surface of spalling that extends deeper into the wall than anyone can see without probing it. A retrofit anchor is only as strong as the concrete holding it, and confirming that concrete is sound is exactly the kind of judgment call a foundation inspection is built to make.
How a pro retrofits an anchor (epoxy-set rod or retrofit mudsill anchor)
Once a bolt is confirmed rusted, sheared, or missing, there are two accepted retrofit methods. The first is an epoxy-set threaded rod: drilling a new hole to the correct depth and edge distance, cleaning it thoroughly, and setting a threaded rod with structural epoxy so it cures into a solid mechanical bond with the concrete. The second is a manufactured retrofit mudsill anchor — hardware like Simpson Strong-Tie’s retrofit anchor line, designed specifically to be installed after the fact through the sill plate into existing concrete, without needing to expose the top of the stem wall from outside. Which one gets used depends on access, the condition of the surrounding concrete, and how many bolts along that wall need replacing at once. This is the core of what anchor bolt replacement covers, and it’s not a job to eyeball — embedment depth and edge distance are what make the difference between a retrofit that holds and one that pulls out under load.
Get Your Foundation Looked At
A quick inspection tells you what is really going on beneath the surface — and we will send a written estimate.
→ Request a Written EstimateHow many anchor bolts should your home have? (code spacing)
Building code (based on IRC requirements) calls for anchor bolts at a minimum of 1/2-inch diameter, embedded at least 7 inches into the concrete, spaced no more than 6 feet apart along the sill plate, with a bolt required within 12 inches of every plate end and at every corner. If you’re checking your own crawlspace and counting fewer bolts than that, or gaps well over 6 feet between them, that’s worth flagging even before you find a rusted one — it may mean the original installation was short to begin with.
What it costs in Phoenix (context: $800–$3,500 range)
Anchor bolt retrofit costs in the Phoenix area typically run in the $800–$3,500 range, depending on how many bolts need replacing, whether the stem wall around them also needs spalling repair, and access conditions. A single loose-nut check obviously costs nothing. A handful of corroded bolts on one wall section sits toward the lower end; a full perimeter retrofit combined with concrete repair around multiple corroded anchor points sits toward the higher end. The only way to get an accurate number for your specific house is a written estimate after someone has actually looked at the bolts and the surrounding concrete — not a phone-quote guess.
Frequently Asked Questions
How do you fix a rusted anchor bolt?
You don’t tighten it — rust has already expanded inside the concrete and likely cracked the stem wall around the bolt. The fix is a retrofit: removing the compromised anchor and setting a new epoxy threaded rod or retrofit mudsill anchor at the correct embedment depth and edge distance, sometimes paired with repairing any spalled concrete around it.
Can you tighten a loose foundation anchor bolt?
Only if the bolt itself is straight and free of rust or pitting, and the concrete around it shows no cracking. In that case, tightening the nut with a wrench is a safe homeowner fix. If there’s any rust or visible concrete damage, tightening can crack the stem wall further instead of fixing anything.
What happens if anchor bolts are missing or rusted?
The wood framing loses its mechanical connection to the concrete foundation at that point. Over time this shows up as shifting or racking in the framing above — doors that stick, drywall cracks near the floor, or a sill plate that has visibly separated from the stem wall. It doesn’t get better on its own.
Can you add anchor bolts to an existing foundation?
Yes. Retrofit anchors — either epoxy-set threaded rod or manufactured retrofit mudsill hardware — are designed specifically to be added to a house after the original pour, without needing to rebuild the stem wall. This is standard practice for homes with missing bolts or bolts that were spaced too far apart originally.
How much does it cost to replace an anchor bolt?
In the Phoenix area, anchor bolt retrofit work generally runs $800–$3,500, depending on how many bolts are involved and whether nearby concrete also needs spalling repair. A written estimate after an on-site look at the bolts and surrounding concrete is the only reliable way to price your specific situation.
Is a rusted anchor bolt dangerous?
It can become one. A single corroded bolt in isolation is a repair item, but a wall with multiple rusted or missing anchors has a genuinely weakened connection to its foundation, which matters most during wind events or ground movement. Arizona’s irrigation moisture and soil chlorides accelerate this corrosion at the base of stem walls, which is why it’s worth checking sooner rather than later — see how that same moisture drives why anchor bolts corrode in Arizona stem walls for the full mechanism.